You have come up with an amazing website idea. This could be an enterprise you plan to venture into, a blog you want to initiate, or even an e-commerce site you wish to set up. You are enthusiastic and keen on doing all this – until you run into the next obstacle: how would you actually go about putting a website on the web?
And the answer to this is through web hosting. But since you’ve never heard of this, it may appear to be a very daunting task altogether. All these things — servers, DNS, SSL certificates, bandwidth, and CMS platforms — might make the process appear difficult at first.
However, choosing the right web design service or hosting setup can simplify the entire process for beginners. The wonderful thing about web hosting is the fact that anybody can do it irrespective of their technical knowledge, and guided properly, hosting a website is not at all difficult to do in one day.
This is an ultimate beginner’s guide where we’ll cover all the aspects of website hosting, including defining what web hosting entails, picking out the best kind of hosting for you, and finally, taking you through the entire process of setting it up and making sure you are well-informed on what you can expect to pay for it. In no time at all, you’ll be armed with everything needed to go live on the Internet.
Let us start from the very beginning.
What Is Web Hosting and How Does It Work?

However, for making well-informed decisions regarding the hosting of your website, it is crucial to comprehend the essence of web hosting, and it is not as complicated as people might think.
Consider your website as a set of files, just like how your computer keeps files, such as documents, images, videos, and many others. Similarly, your website consists of several types of files, such as HTML files, CSS files, images, videos, databases, and more.
A professionally built website using modern WordPress web design services can make managing these components significantly easier for business owners. Since you require access to your website round the clock from anywhere in the world, it is essential to store your website files in a computer connected to the Internet all the time.
This is how the whole process works in reality. When someone types your website address, say www.yourwebsite.com, into their browser and presses Enter, their web browser will send the request over the Internet to your website computer for your website data. The computer will receive your request and send back your website data. Your web browser will put together all your website data and display it on your screen. All these processes will be completed in just a few seconds or even less.
One of the most crucial aspects about which beginners tend to get confused is the connection between web hosting and domain names. Your domain name (www.yourwebsite.com) is the address of your website, which makes it easier for other people to locate it through a browser on the web.
Types of Web Hosting: Which One Do You Need?
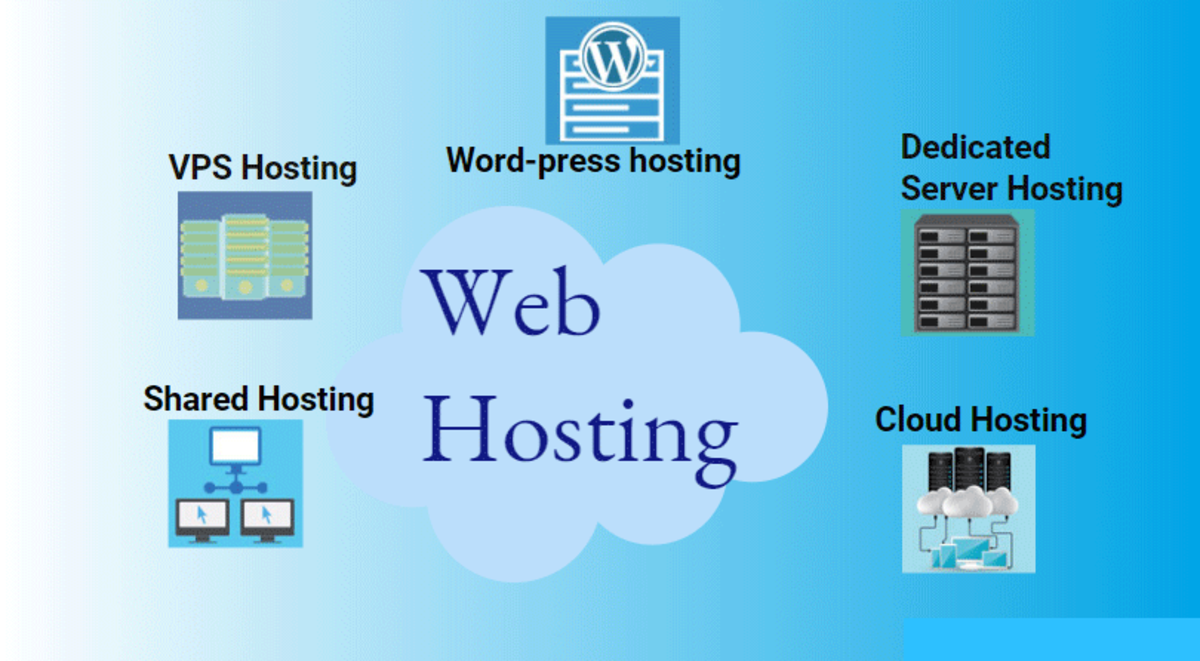
Choosing the correct form of web hosting is a decision that you need to make wisely, or else it will lead to overspending, insufficient performance, or difficulty in managing your expanding website. This article provides a comprehensive analysis of the five major types of web hosting, including their advantages, disadvantages, and the best use cases for each.
Shared Hosting — Best for Beginners
Shared hosting is the most common and inexpensive form of web hosting – and it is almost always the best choice for newbies, startups, bloggers, and everyone creating their first ever website.
As the name indicates, shared hosting means that your website shares a single computer/server with hundreds or even thousands of other websites. All those websites share the very same computer resources, namely, processor speed, memory (RAM), and hard drive capacity.
The hosting service takes care of all hardware, management, and security aspects on your behalf, which means that you do not require any technical skills to use shared hosting.
There are plenty of good reasons to use shared hosting. First and foremost, it is the cheapest option available: quality shared hosting plans can be found for just $2 to $10 per month. Second, they are very easy to set up, particularly since most shared hosting providers offer one-click installation for platforms like WordPress. This is one reason many businesses prefer WordPress websites for business use due to their flexibility and beginner-friendly setup.
The problems associated with shared hosting come into play when your website grows and expands. Due to the nature of shared hosting, you may experience issues with the performance of your website depending on what those “neighboring” sites on your server are doing. It is a concept known as the “bad neighbor effect,” in which a server overload from one site on the server may impact the performance of all other sites.
VPS Hosting — Best for Growing Websites
Virtual Private Server hosting is the next best thing after Shared Hosting, and unlike Dedicated Hosting, it offers better speed and features without the high costs that come with a dedicated server.
In a VPS hosting plan, the physical server is divided into several virtual machines via virtualization technology. The virtual server functions like an individual server, complete with its CPU, RAM, and storage space, meaning that you are guaranteed all the perks of having your own server but without having to break the bank.
Some of the most notable strengths of VPS hosting are performance, control, and scalability. Your server space is dedicated, ensuring that the performance of your website does not depend on the actions of other users. You are provided with root access to your server environment, giving you a lot of control over your hosting plan. For example, you will be able to install custom applications and configure your server. VPS is more scalable than shared hosting; you will be able to increase your server space relatively quickly.
With VPS hosting, the key factor that one needs to consider is that the technical knowledge required to utilize the service is a bit higher than what is required for shared hosting services, especially when going for unmanaged VPS services, whereby you would be expected to manage the server administration and maintenance by yourself.
Dedicated Hosting — Best for High-Traffic Sites
As indicated by its name, dedicated hosting offers a whole lot of a server that is completely dedicated only to your website; you don’t share anything with anyone. The entire capacity of the server in terms of processing power, RAM, storage space, and data transfer is solely under your domain.
The unique aspect of dedicated hosting offers the maximum performance, reliability, and security offered by conventional web hosting solutions. Dedicated hosting services are mostly used for large-scale enterprise websites, very popular online stores, and applications that demand high technical standards, where performance, reliability, and security are not negotiable, but budget is secondary.
As compared to other types of web hosting, the performance benefits of dedicated hosting services cannot be ignored. Without being involved in resource sharing, your website can easily handle high-traffic volume without any performance issues. Moreover, you get to configure hardware and software specifications of your choice on the server, whereas the security aspects become much stronger without other websites hosted on the same server.
Another downside of this type of web hosting service is its price. Prices for a dedicated server usually start at $80 and can go up to $500 and higher per month. Only if you earn enough money on your website will it be worthwhile to spend such money. In addition, a lot of knowledge is required to operate a dedicated server correctly, although there is managed dedicated hosting, which allows using a server without deep expertise.
You should opt for dedicated hosting if your website/application works very intensively, your company cannot afford any downtime of the server, or has some important issues related to security, for example, storing confidential customer information.
Cloud Hosting — Best for Scalability
Cloud hosting is a complete departure from the traditional concept of web hosting, one that has gained much popularity in the last ten years and has emerged as one of the most commonly used web hosting services available today.
Rather than housing your website on one particular server, like traditional shared, VPS, and dedicated web hosting options, cloud hosting allows your website to be spread out among several servers that form a virtual cloud. Your website’s content and information are stored in a distributed manner on several servers, and when someone visits your website, they will be provided service from the fastest available server in the cloud.
The primary benefit of cloud hosting services is the high scalability that they offer. Contrary to regular hosting services, where you are required to pay for a fixed amount of computing resources regardless of how much or little you actually use, in cloud hosting, you can scale up the computing resources depending on the level of traffic to your site and vice versa.
Secondly, cloud hosting is more reliable than conventional single-server hosting. Since the website is stored on multiple servers, if one of the servers fails, traffic will just be routed through another one.
Managed WordPress Hosting — Best for WordPress Sites
Managed WordPress hosting is a hosting environment specifically optimized for WordPress websites. Businesses investing in professional WordPress web design services often choose managed hosting because it improves performance, security, and website maintenance.
A managed WordPress host performs all of the WordPress-related tasks that you would normally be responsible for: updating WordPress, backing up data, monitoring and detecting any malicious activity, improving performance through caching and optimization, etc. Moreover, the dedicated servers for hosting WordPress websites work much more effectively compared to the standard hosting services.
The main benefit of managed WordPress hosting is that you can enjoy excellent performance while not having to take care of any of the related operations. You do not have to update WordPress manually, secure your site, monitor its performance — all these aspects will be taken care of by your hosting company.
The primary disadvantage of managed WordPress hosting is that it is very costly compared to normal shared hosting, which starts from around $15 to $60 per month for low-level plans and even more depending on the traffic generated by the site. The other disadvantage is that it is dedicated only to WordPress, meaning that you cannot host any other platforms using the same service.
Among some of the most popular managed WordPress hosting companies are WP Engine, Kinsta, Flywheel, and Pressable, and for affordable options, you can consider SiteGround and Bluehost.
If you have built your site with WordPress and would like to get the highest performance out of it without getting involved in technical administration, then managed WordPress hosting is for you.
How to Host a Website: Step-by-Step for Beginners
Having gained an understanding of what web hosting means and the type that you need, it is now time to explore the entire procedure involved in hosting a website. Here are seven simple steps that will guide you towards getting your site hosted online.
Step 1: Choose the Right Hosting Plan
The next step after this is the choice of the hosting that is needed by you, and it is vital to choose your hosting wisely since the performance, efficiency, and budget related to hosting your website depend on this choice.
First of all, evaluate your needs in order to choose the right kind of hosting. What kind of website do you need? The hosting of a personal website or a small business website cannot be compared to the hosting of an online store or an advanced web application.
The following characteristics should be considered when choosing hosting companies:
• Uptime – look for providers who ensure no less than 99.9% uptime, ensuring that your website will be available for access to users almost 100% of the time.
• Speed and performance are extremely important when choosing a hosting provider. Technologies like SSD storage, LiteSpeed servers, and caching systems can dramatically improve website speed. Businesses also commonly follow website speed optimization practices to improve both user experience and SEO rankings.
• Support – look for providers with 24/7 customer support via multiple channels (chat, telephone, email) and known for providing high-quality customer assistance.
• Ease of use – look for providers with a convenient control panel (most hosting providers provide cPanel or some proprietary version of the control panel) and one-click installations of WordPress or other major platforms.
Bluehost, SiteGround, Hostinger, DreamHost, and A2 Hosting – those providers are some of the best ones on the market today, and they are known to be affordable for starters.
After selecting the right hosting service and purchasing an appropriate plan, you can proceed further.
Step 2: Pick and Register Your Domain Name
Your domain name refers to the address people use to access your website online. Choosing a strong domain and pairing it with effective branding and website design for small businesses can make your brand appear much more professional and trustworthy.
Here are some tips for picking a good domain name. Choose something short and memorable; the shorter the better, because people tend to recall names and addresses that are short. Try to make sure that your domain has a maximum of 15-20 characters if possible.
The second principle concerns the readability and memorability of your domain name; it must be easily spelled and pronounced because people will sometimes refer to it verbally without being able to see it written down. Try to choose the .com ending as much as possible because, despite the numerous alternatives such as .net, .org, .co, or .io, the .com ending is definitely the most famous and trusted one.
After identifying some potential names for your website, you will then be required to verify if the names are available because millions of domains already exist. To check availability, you can do this either via the various domain name registrars, including Namecheap, GoDaddy, Google Domains, or directly via your hosting company’s website (hosting companies usually offer free domain name registration services along with their hosting service packages).
Usually, the price range for purchasing domain names runs from $10 to $20 annually for the most common domain names. In case the preferred domain name is unavailable for the .com extension, consider creating another one by appending additional words before and/or after the name of your brand.
Step 3: Set Up Your Hosting Account
Now that you have settled on a hosting package and a domain name, it’s time to actually create your account on the server. Although there may be slight variations in the process depending on your hosting company, the basic procedure for creating an account remains pretty much the same.
Visit the website of your hosting company and choose your hosting package. During the ordering process, you’ll be prompted to register your new domain (if your hosting company is selling it along with their services) or to input an already purchased domain name.
Input all your personal data – name, e-mail, billing details, and other information that is necessary to complete the registration process. Be careful when reviewing your plan, as the difference between the price of your first term and the price after the initial period usually can be quite large. You should remember that it might save you money if you pay several years in advance.
Once you have completed your order, you will be greeted by an email from your host that contains all the information you need to log in to your account, including your server details (including your nameservers – key for the next step) and links to your hosting control panel.
Access your hosting control panel (usually it is cPanel or a special one) and spend some time getting used to its interface. You have all the necessary functions to work with your files, manage emails, install WordPress, create databases, and many other things that you may never use.
Step 4: Connect Your Domain to Your Hosting
In case you have registered the domain name with the same hosting company, then you do not need to worry about connecting the two – it will happen automatically as your domain and hosting are one. But, if you registered your domain from some other registrar, such as Namecheap or GoDaddy, then you need to connect the two using the DNS settings.
The following are the steps involved. First, you should log into your hosting account and find out your hosting account’s nameservers. These are basically two nameservers that appear as ns1.yourhostingprovider.com and ns2.yourhostingprovider.com. This information will either come to you through your welcome email from your hosting or you can check it out from your hosting control panel. Once done, log in to your domain registrar account and check out your domain DNS settings.
After updating your nameservers, the changes must be propagated throughout the Internet’s DNS system, which may happen over a span of time ranging anywhere between several minutes and up to 48 hours. In any case, your domain’s nameserver records are updated worldwide to point to your new web hosting server.
The easiest way to check the status of DNS propagation is to use a tool such as whatsmydns.net. Simply type your domain name on their website, and you’ll get a list of DNS updates from different countries.
Step 5: Install a CMS or Upload Your Website Files
Now that your domain is associated with your web hosting, you can start putting your website on your server. The process is different depending on whether your site was already developed in a certain way or will be developed by you in a certain way.
Approach 1: Install a CMS. A CMS (short for “content management system”) is software that allows users to easily create and manage website content through a convenient graphical user interface without having to deal directly with the coding behind it all.
WordPress remains the world’s most popular CMS and powers a massive percentage of websites globally. Many businesses choose WordPress because of its flexibility, plugin ecosystem, and scalability. If you are creating your first site, learning how to create a website for your business can help simplify the process significantly.
You have to click on the button and enter your basic WordPress settings (site title, administrator login details, etc.), and after several minutes, your WordPress blog will be up and running. You can access it at www.yourdomain.com/wp-admin and immediately begin customizing your site with themes, plugins, and page builders. Many companies also invest in professional web design services to create a more polished and conversion-focused website experience.
Option 2: Manual Uploading of Website Files. In case you have a professional design of your website and you have all the files ready on your computer, or have made your website without a CMS and using HTML, CSS, and JavaScript programming languages, you will have to manually upload all of them to the hosting server.
This process is done using an FTP (File Transfer Protocol) client like FileZilla. For advanced websites or online stores, businesses often combine hosting with custom ecommerce web design services to improve functionality and user experience.
Step 6: Install an SSL Certificate
After your website installation and its development are done, the next crucial technical step that must be performed before launching your website is installing an SSL certificate. Installing an SSL certificate for your website is an obligation — there are no alternatives because, without it, no website can exist in today’s environment.
An SSL (Secure Sockets Layer) certificate is a security protocol that creates an encrypted link between your website’s server and its visitors’ browsers, making sure that all the data transferred between these two points cannot be accessed by any third party. Once you install an SSL certificate on your website, the http:// in its address will change to https://.
There are many key reasons why SSL cannot be overlooked when developing today’s websites. Google uses HTTPS as one of its ranking signals, meaning secure websites often perform better in search results. Following proper technical SEO practices can help ensure your website remains secure, fast, and search engine-friendly.
Web browsers specifically warn users against visiting non-SSL websites – Google Chrome and others show clear “Not Secure” warnings when a user visits an HTTP site, reducing trust in such sites significantly.
The best thing is that SSL certificates have become readily available at no cost at all, as part of the initiative by Let’s Encrypt, a non-profit certificate authority offering SSL certificates for any website at absolutely zero cost.
Step 7: Launch and Test Your Website
It’s almost time for launch. But before you launch your website and begin to advertise it to the whole world, it is important that you carry out a final test to make sure that everything is in place. The reason why testing your site is necessary before launch is that it is not very nice to have broken links and other technical issues in your website.
This is an exhaustive list of tests to be conducted before launching the website. Start with testing all your links. You need to click on every link available on all pages and ensure they redirect to their intended destination.
Broken links will not only frustrate your visitors but will also be penalized by search engines. Test the website on various browsers — your website must appear and operate normally on all popular browsers like Google Chrome, Mozilla Firefox, Safari, Edge, and Opera.
Perform a Mobile-Friendly Test by using Google’s Mobile-Friendly Test tool. Test page loading speed carefully before launching your website. Slow websites negatively impact both user experience and SEO rankings. Many businesses work on speeding up their WordPress websites to improve conversions and reduce bounce rates.
Websites taking too long to load cause visitors to abandon them quickly – according to research, most users give up on a webpage after 3 seconds. Verify the function of your SSL certificate – make sure that you are able to access your website using the https:// link and that your website comes with a locked padlock icon.
How Much Does It Cost to Host a Website?

Among the frequent questions asked by beginners who need web hosting is the following: How expensive is it? And the true answer to this question is that there are great differences based on the type of web hosting, chosen host, and services provided.
When it comes to the most budget-friendly type of web hosting, you should definitely start with shared hosting. Most well-known shared hosting plans can be found in the price range between $2 and $10 per month on a yearly basis. Nevertheless, it is necessary to consider the issue of promotional prices offered by numerous web hosts. For example, there are many companies that offer extremely cheap hosting plans (for instance, for $1–$2 monthly), but their renewals cost about $8–$15 monthly.
A VPS account is undoubtedly a huge leap in terms of both performance and cost. The lowest unmanaged VPS accounts usually start from about $20-$40 per month, whereas a managed VPS will cost anywhere between $40 and $100 per month for normal accounts, with more costly high-end VPS packages available.
Premium managed hosting services usually cost more because they include enhanced performance, backups, security, and support. Businesses serious about growth often combine quality hosting with SEO services and professional web design to maximize online visibility and conversions. Depending on the plan, the premium plans that cater to high-traffic websites will charge $100-$400 monthly.
Finally, the purchase of domain names will add another cost of about $10-$20 every year, although, as previously highlighted, some of the hosting companies offer their customers a one-year free registration of their chosen domain name.